A Comprehensive Guide to Deploying Next.js Apps with Docker, Nginx, and Let’s Encrypt on GCP
In this blog post, we will cover the deployment of a Next.js website or blog using Docker, Nginx, and Let’s Encrypt on Google Cloud Platform (GCP). If you do not have a Next.js project that you can work with, pull one of the template projects like the Next.js blog starter to follow along with. This post won’t work with the internals of Next.js, so any application that builds successfully will work here.
Aspects of this tutorial will apply to other cloud providers as well. This is one reason why I like to use a VPS, in addition to the cost benefits. For instance, in GCP, you create firewall rules to allow select access to ports. This is equivalent to using ufw on a provider like Vultr.
Resources
- Install Docker Engine on Ubuntu
- Certbot instructions
- Certbot documentation
- Certbot Command Line Options
- Generate SSL Certificate Silently - StackOverflow
- Fixing Certbot’s parsefail error
Introduction
Next.js is a popular React framework that simplifies web application development. Features like server-side rendering and static site generation make Next.js a good choice for static blog website development. In this guide, we’ll use Docker to containerize a Next.js application and deploy it with Nginx on Google Cloud Compute Engine. The site will be secured with a free SSL certificate from Let’s Encrypt.
We’ll use a virtual private server (VPS) on Google Cloud’s Compute Engine, which can offer significant cost advantages over pre-packaged solutions (like platform-as-a-service, such as Cloud Run) for personal web applications or other projects that don’t require advanced processes like automatic scaling or serving a large number of users worldwide.
We have two main objectives:
- Demonstrate how to set up this deployment on Google Cloud Compute Engine.
- Explain the requirements for deploying on any cloud provider.
Setting up a Google Cloud Compute Engine Instance
Creating the Server
If you haven’t signed up for Google Cloud, you can create an account and receive $300 in free credits. Additionally, this deployment falls under the free tier, allowing you to use it for free for a certain period. Google Cloud Platform (GCP) is user-friendly, with all operations accessible through the gcloud CLI or the “Cloud Console” web interface.
- Create a new project or use the default project.
- Navigate to Compute Engine and enable the Compute Engine API if not already enabled.
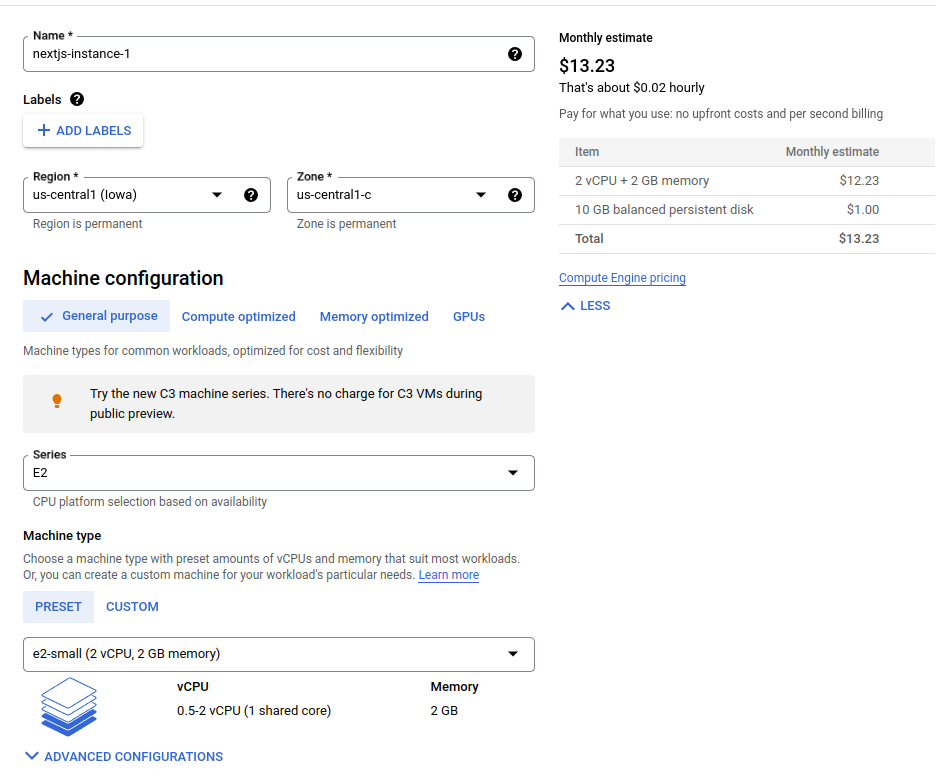
- Name the instance, and select a region and zone.
- Choose a machine type; we recommend using
e2-small.
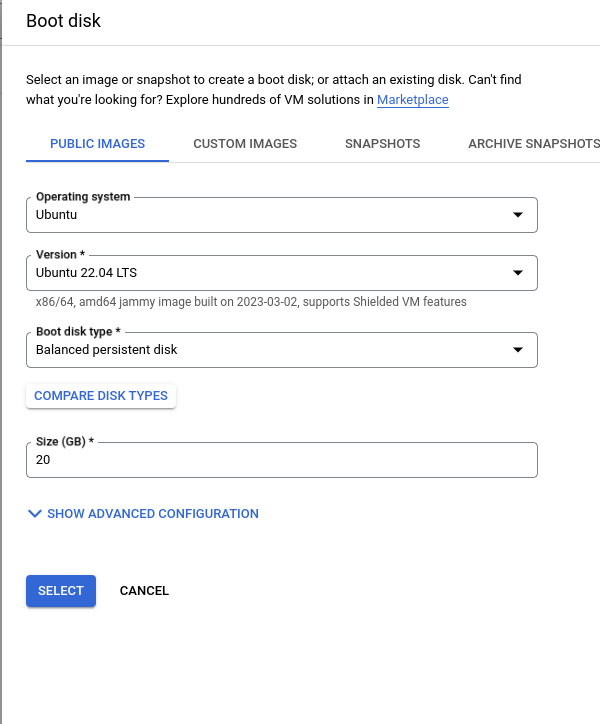
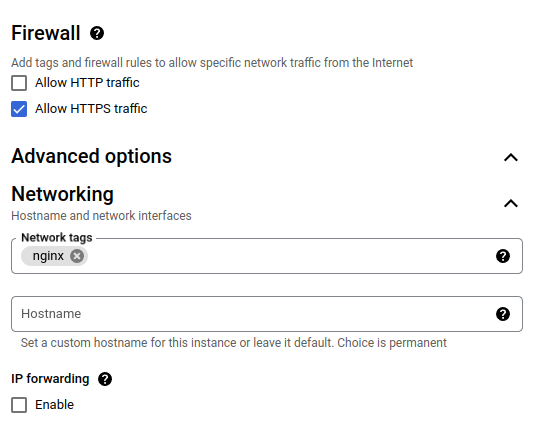
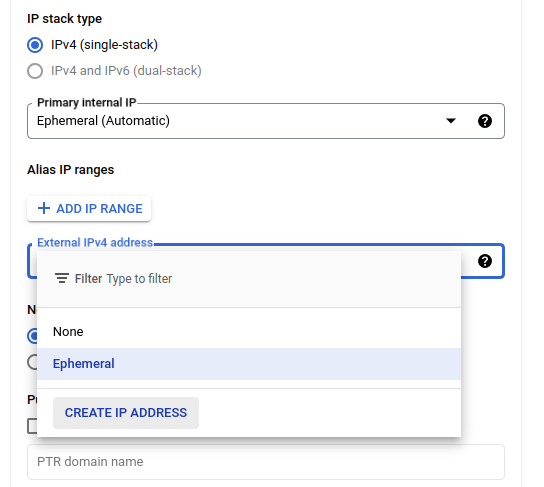
Configure the firewall rules by allowing HTTPS traffic and adding the nginx network tag. Although this tag doesn’t have any immediate effect, we’ll create a firewall rule later that applies to all instances with this tag. For the IP address, you can reserve an external IP address, or leave it as the default Ephemeral. Note that if you don’t reserve an IP address, the server’s external IP address will change upon restart. Having a static external IP address can be helpful when configuring a domain name to point to this IP address.
Note: When choosing to allow HTTPS traffic, you are applying a pre-configured firewall rule to allow that particular type of traffic into the VPS. If you don’t choose this here, we’ll be able to apply the appropriate rules later on when we configure Nginx and Let’s Encrypt.
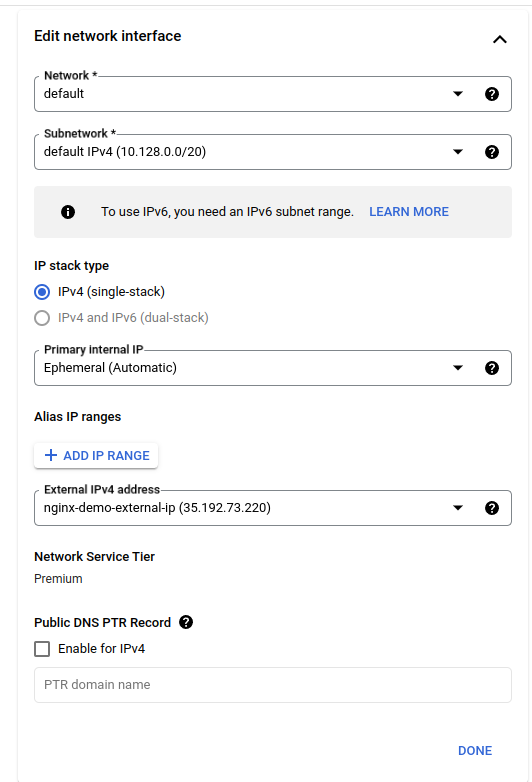
Configuring the Firewall Rules
The next step is to configure the firewall rules to allow HTTPS traffic to the VPS. This traffic will need to be allowed to access the appropriate ports used by Nginx and Let’s Encrypt, specifically 80 and 443 through TCP.
The default firewall rule set when creating the instance allows access to port 443 over TCP. This is why applying that at server creation is unimportant, as we’re going to do that now.
Additional Note: If you’re using a different cloud provider, like Vultr, you will need to use ufw to apply these rules. ufw does not work with GCP, you must apply the firewall rules through the VPC firewall rules section of the Console, or through the gcloud CLI.
I will provide the ufw commands later on. For GCP, navigate to VPC Network -> Firewall.
- Name the rule (e.g.,
nginx-certbot). - Set it as an Ingress rule, allowing traffic to ports
80and443through TCP. - Specify the target tag as
nginx(or whatever tag you assigned to the instance at creation). - Apply
0.0.0.0/0as the IPv4 range to allow traffic from all IP addresses.
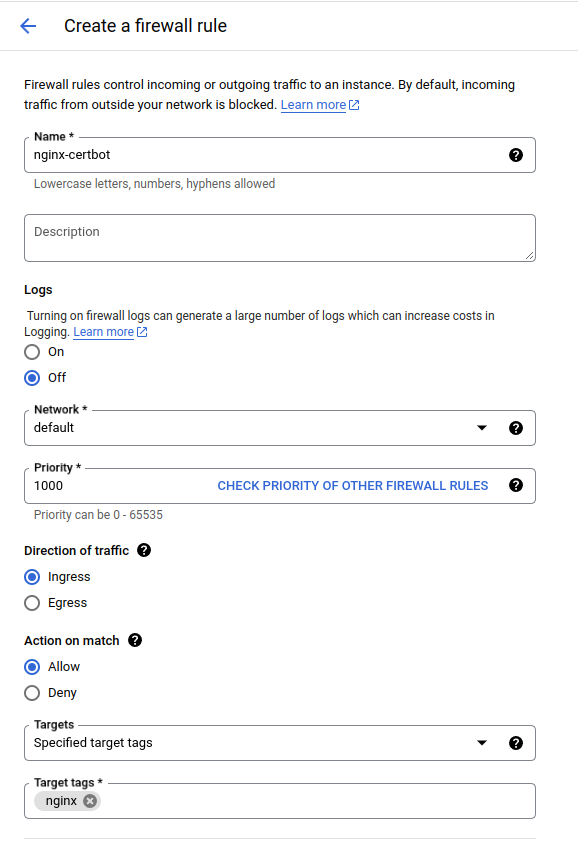
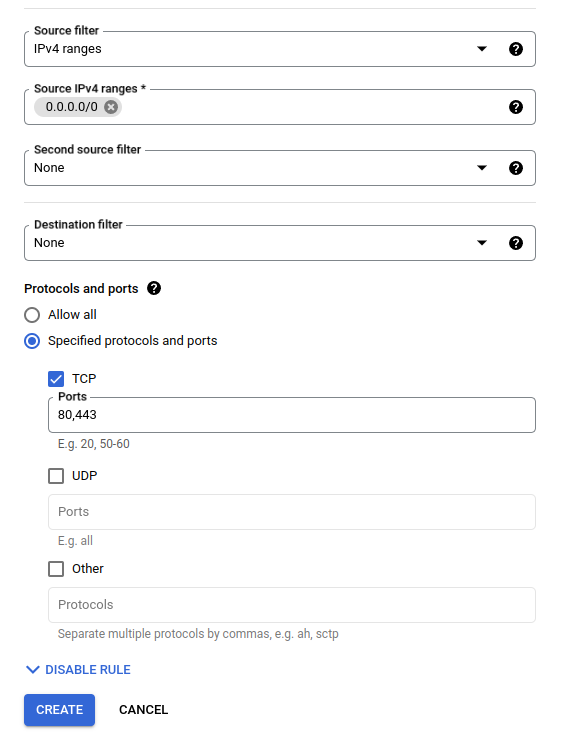
Once the firewall rules are configured, you can access the server via SSH using gcloud, or through the integrated SSH client on the GCP Console.
Configuring Firewall Rules Through ufw
If you are using GCP, this section does not apply. If you’re using a provider that allows you to modify firewall rules through the server, then you may use ufw with Ubuntu to open the required ports for the application to be accessed over the internet.
sudo ufw allow 80/tcp
sudo ufw allow 443/tcp
Install Dependencies
Overview
- Update and upgrade packages, restart the server
- Assume that the virtual machine name is
nextjs-instancefor the following examples. Replace this with whatever you’ve named your machine. gcloudwill be used for examples. Remember to set a default project, region, and zone for the configuration. This allows you to run commands without specifying these parameters, provided that the resource you are attempting to access is within those set parameters.
VM Initial Upgrades
SSH into the virtual machine, upgrade, and restart:
- Use the
gcloudCLI or GCP Console’s built-in SSH client to SSH into the virtual machine. - Run
sudo apt updateto update the package list. - Run
sudo apt upgradeto upgrade the installed packages. - Restart the system using
sudo reboot.
Install Certbot Dependencies
Run the following command to install Certbot and its Nginx plugin:
sudo apt update && sudo apt install -y certbot python3-certbot-nginx uidmap
Install Docker
To install Docker on your Ubuntu system, run the following commands:
curl -fsSL https://get.docker.com -o get-docker.sh
sudo sh ./get-docker.sh
# allow the installation to complete
rm ./get-docker.sh
Docker compose will be installed through the convenience script along with Docker Engine. Note: Make sure to check the Docker Compose release page for the latest version, and ensure that this script url is up to date.
Test the installations
To verify that Docker and Docker Compose are installed correctly, run the following commands:
docker --version
docker-compose --version
These commands should return the installed versions of Docker and Docker Compose, respectively. If they do, you’re good to go!
You now have all the necessary dependencies installed for your deployment. Proceed with configuring your application and deploying it using Docker and Docker Compose.
Securing Your Website with SSL Certificates
Note: It’s crucial to create a backup of your Let’s Encrypt files. By doing so, you can easily apply the generated certificate to a new server without generating a new one, should the need arise. This is particularly important because there is a limit to the number of certificates you can generate for a specific domain name within a certain time frame. The current rate limits for Let’s Encrypt can be found here.
To test if you can generate a certificate, run the command below. Once you’re ready to generate the certificate, simply remove the --dry-run flag.
sudo certbot certonly -n --nginx --agree-tos -m me@example.com -d example.com -d www.example.com --dry-run
This will obtain an SSL certificate for your domain to enhance security and build trust with visitors to your site. An SSL cert should be considered a requirement for any modern website.
Stopping Nginx
After generating a certificate and each time the server reboots, Nginx will start at the system level. This occurs because Nginx is added when Certbot is run in this configuration. To free up the port for the Nginx container that will run in Docker, we need to stop Nginx.
sudo systemctl stop nginx;sudo nginx -s stop
To prevent Nginx from starting up when the server restarts, you can disable it using the following command:
sudo systemctl disable nginx
Transferring SSL Certificates to Another Server
Backing up or transferring SSL certificates to another server is straightforward, but you must be mindful of the symbolic links created during the process. First, back up the entire letsencrypt directory created by Certbot at /etc/letsencrypt. When transferring to another server, copy this entire directory to the same location.
Replace example.com with your domain in these instructions. We need to recreate symbolic links in two key directories:
/etc/letsencrypt/live/example.com/etc/letsencrypt/archive/example.com
Compare the contents of the archive/example.com directory with those of the live/example.com directory. If you have one set of files, the archive files will have 1 appended to their names. Create a symbolic link for each file in archive/example.com to live/example.com, removing that number from the symbolic link name.
LIVE="/etc/letsencrypt/live/example.com"
ARCHIVE="/etc/letsencrypt/archive/example.com"

# Remove files from live/example.com
# Create sym links from archive/example.com to live/example.com
cd "$LIVE"
rm cert.pem chain.pem fullchain.pem privkey.pem

ln -s "$ARCHIVE/cert1.pem" "$LIVE/cert.pem"
ln -s "$ARCHIVE/chain1.pem" "$LIVE/chain.pem"
ln -s "$ARCHIVE/fullchain1.pem" "$LIVE/fullchain.pem"
ln -s "$ARCHIVE/privkey1.pem" "$LIVE/privkey.pem"
By following these steps, you’ll be able to easily transfer SSL certificates without worrying about hitting the rate limit.
Containerizing the Next.js Application
To containerize the Next.js application, create a Dockerfile in the same directory as the project. As we’ll be using Docker Compose, it’s helpful to have a parent directory above the Next.js project.
Project Structure
Our project structure should resemble the following:
.
├── docker-compose.yml
├── nextjs-app
│   └── Dockerfile
└── nginx
    └── nginx.conf
Creating the Dockerfile
In the nextjs-app directory, create a Dockerfile with the following contents:
# Specify the base image
FROM node:18-alpine AS base

# Set the working directory
RUN mkdir -p /usr/src
WORKDIR /usr/src

# Copy the application files
COPY . /usr/src

# Install dependencies and build the application
RUN yarn
EXPOSE 3000
CMD ["yarn", "run", "start"]
This Dockerfile sets up a container with Node.js, installs the necessary dependencies, builds the Next.js application, and starts the application on port 3000.
Additionally, create a .dockerignore file to exclude specific files and directories from the build context. This helps to optimize the build process and reduce the size of the final Docker image.
node_modules
.npm
.git
Now, you’re ready to create the docker-compose.yml file and the Nginx configuration in the parent directory to complete the setup.
Nginx Configuration
Next, you’re going to want to create an Nginx configuration file.
- Create a directory named
nginxin the same folder where yourdocker-compose.ymlfile will be. - Create
nginx.confand add the following:
server {
    server_name example.com www.example.com;

    # for certbot renewal
    location ~ /.well-known/acme-challenge {
        allow all;
        root /data/letsencrypt;
    }

    location / {
        # Port that next js is running on
        proxy_pass http://nextjs:3000;
        proxy_http_version 1.1;
        proxy_set_header Upgrade $http_upgrade;
        proxy_set_header Connection "upgrade";
        proxy_set_header Host $host;
        proxy_set_header X-Real-IP $remote_addr;
        proxy_set_header X-Forwarded-For $proxy_add_x_forwarded_for;
        proxy_set_header X-Forwarded-Proto $scheme;
        proxy_set_header X-Forwarded-Host $host;
        proxy_set_header X-Forwarded-Port $server_port;
    }

    listen 443 ssl;
    ssl_certificate /etc/letsencrypt/live/example.com/fullchain.pem;
    ssl_certificate_key /etc/letsencrypt/live/example.com/privkey.pem;
    include /etc/letsencrypt/options-ssl-nginx.conf;
    ssl_dhparam /etc/letsencrypt/ssl-dhparams.pem;
}

server {
    if ($host = example.com) {
        return 301 https://$host$request_uri;
    } # managed by Certbot

    server_name example.com www.example.com;
    listen 80;
    return 404; # managed by Certbot
}
Docker Compose
Create a docker-compose file to define the Next.js and Nginx services:
version: '3.8'

services:
  nginx:
    container_name: 'nginx'
    image: nginx:latest
    ports:
      - "80:80"
      - "443:443"
    volumes:
      - ./nginx/nginx-conf:/etc/nginx/conf.d/default.conf
      - /etc/letsencrypt/ssl-dhparams.pem:/etc/letsencrypt/ssl-dhparams.pem
      - /etc/letsencrypt/options-ssl-nginx.conf:/etc/letsencrypt/options-ssl-nginx.conf
      - /etc/letsencrypt/live/example.com/fullchain.pem:/etc/letsencrypt/live/example.com/fullchain.pem
      - /etc/letsencrypt/live/example.com/privkey.pem:/etc/letsencrypt/live/example.com/privkey.pem
    networks:
      - docker-network
    restart: always
  nextjs:
    build: ./nextjs-app
    ports:
      - "3000:3000"
    restart: always
    networks:
      - docker-network

networks:
  docker-network:
    driver: bridge
Deploying Your Application
With the Docker and Nginx configuration in place, it’s time to deploy the application.
- Run
docker-compose up -din the same folder as yourdocker-compose.ymlfile. - Test the application by accessing the domain in a web browser. You should see your application served securely over HTTPS.
Managing Memory
One thing to keep in mind with this set up is the build cache. I’ve run into the scenario where the build cache on the machine reaches over 10GB. To solve this problem, you’ll need to periodically remove the build cache:
sudo docker builder prune
This should free up the disk space. Note however that this may result in a longer build time for your next release.
Conclusion
By following this tutorial, you have successfully containerized a Next.js application using Docker, deployed it with Nginx on Google Cloud Compute Engine, and secured it with Let’s Encrypt SSL certificates. The deployment process outlined in this guide can be applied to other VPS providers, making it a versatile solution for any Next.js project. With this deployment strategy, you can focus on developing your application, knowing that your project is efficiently hosted and securely served to your users.